How to install and use Comodo Firewall
COMODO Firewall is a respected, full featured, free firewall for personal use. I started using it after my previous firewall called ZoneAlarm started using “Rogueware” tactics to trick users into purchasing more of their product, as we reported here. This tutorial is designed to address the needs of both the Beginner and Advanced user.
1. What is a Firewall?
A firewall acts like a doorman or guard for your computer. It has a set of rules about what information should be let in and what information should be let out of your computer. A firewall is the first program that receives and analyses incoming information from the Internet and the last program that scans outgoing information to the Internet.
It prevents hackers or other intruders from accessing personal information stored on your computer, and prevents malware programs from sending information to the Internet without your authorisation. COMODO Firewall is a well-known and respected firewall software. It is free software, which means you can use it without purchasing a license.
Running a custom firewall program may initially require considerable time and effort to ensure that all the settings are correct and suited to the way you use your computer. After an initial learning period, the firewall will work seamlessly, requiring minimal intervention on your part.
Warning!: Never access the Internet without a firewall installed and running on your computer! Even if your Internet modem or router has its own firewall, it is strongly recommended that you have one installed on your computer as well.
2.0 Overview of the COMODO Firewall Installation
Installing COMODO Firewall is a relatively easy and quick procedure, divided into two stages: the first involves manually disabling the Windows Firewall, and the second is the actual COMODO Firewall software installation.
Ideally, you should only use one firewall program for your computer system at any given time. If you are currently using another firewall on your computer, it must be uninstalled before you install COMODO Firewall, so as to eliminate potential software conflicts between similar types of programs.
2.1 How to Disable the Windows Firewall
To disable the Windows Firewall program, perform the following steps:
Step 1: Select Start > Control Panel > Windows Firewall to activate the Windows Firewall screen.
Step 2. Check the Off (not recommended) option to disable the Windows Firewall as shown in Figure 1 below:
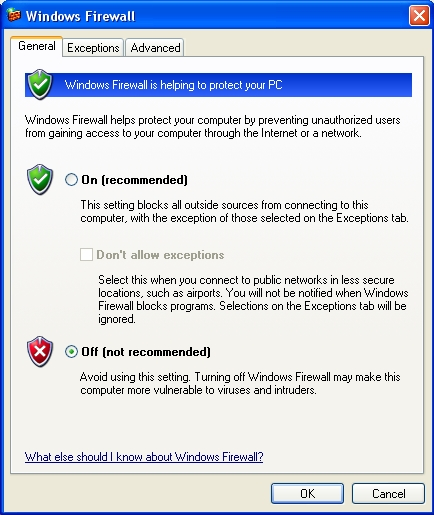
Figure 1. The Windows Firewall with the Off option enabled
Step 3. Click  to complete disabling the Windows Firewall.
2.2 How to Install COMODO Firewall
Note: COMODO Firewall does not automatically uninstall older or previously existing versions of its software. It must be manually uninstalled it before you begin installing the latest version.
To begin installing COMODO Firewall, perform the following steps:
Step 1. Double click  to begin the installation process. The Open File – Security Warning dialog box may appear. If it does, click
  to activate the following confirmation dialog box:
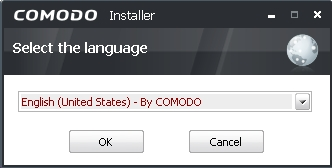
Figure 2: The Select the language confirmation dialog box
Step 2. Click  to activate the End User License Agreement. Please read the End User License Agreement before proceeding with the rest of the installation process, and then click
  to activate the Free Registration screen.
Step 3: Do not enter your email address into the Enter your email address (optional) text field; simply click  to activate the Extracting the Packages screen.
After the extraction process has been completed, the Firewall Setup Destination Folder appears.
Step 4. Click to accept the default path and activate the Firewall security level selection screen, and then check the Firewall Only option as follows:
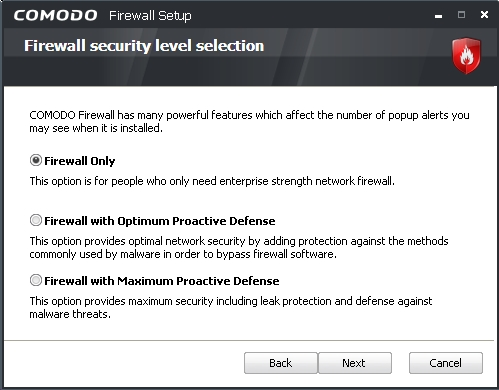
Figure 3: The Firewall Security level selection screen
Definition of Firewall Security Level Options
Each firewall security level option caters to users of different levels. Each option balances different kinds of protection with complexity of usage, as well as the number of security alerts you may receive. A brief description of each security level is provided as follows:
Firewall Only mode: This option lets you run COMODO Firewall without the Defense + feature enabled. It readily identifies popular applications which are relatively safe (like web browsers and email clients), reducing the number of security alerts you may receive. It offers general explanations of why a particular alert screen has appeared. In addition, the actions to be undertaken are relatively simple.
Firewall with Optimum Proactive Defense mode: This option combines the solid protection of the Firewall Only mode with the Defense+ feature enabled. Defense+ offers active protection against malware designed to circumvent different firewalls. The COMODO Firewall Alerts offer more in-depth explanations of why a certain application or request is being blocked, and you have the option of partially isolating or ‘sandboxing’ a suspicious file or program.
Firewall with Maximum Proactive Defense mode: This option combines the security of the Firewall with Optimum Proactive Defense option with ‘anti-leak’ protection against more ‘passive’ security threats, for instance details about open ports on your computer being sent over the Internet. The sandbox feature is fully automated.
Step 6. Click to activate the COMODO Secure DNS Configuration screen, with the I would like to use COMODO Secure DNS Servers option enabled as follows:
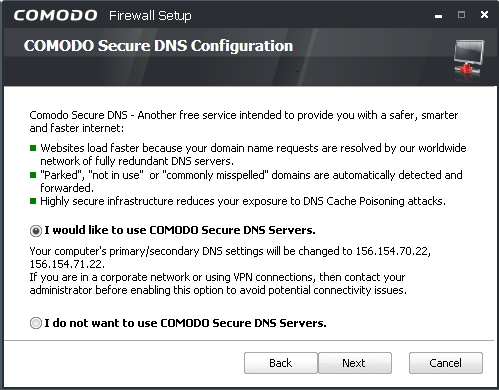
Figure 4: The COMODO Secure DNS Configuration screen
Important: Although no Domain Name System (DNS) server is ever completely secure, the advantages of using the COMODO Secure DNS Servers outweigh the disadvantages. It offers additional protection from pharming and phishing, which are two popular methods used by malicious forces to ‘hijack’ or redirect your computer to a dangerous or hostile site. COMODO Secure DNS Servers may also protect you from government interference, while being easy to set up during the installation process, and by facilitating safer access to web sites which are registered with COMODO. For instance, accidentally typing in the wrong URL will activate a message from the COMODO Secure DNS Servers resembling the following:

Figure 5: A typical example of a COMODO Secure DNS Server notification
Step 7. Click to activate the Ready to Install COMODO Firewall screen, and then click  to begin the installation process, and activate the Installing COMODO Firewall screen. After the installation process has been completed, it will activate the Completed the COMODO Firewall Setup Wizard screen.
Step 8. Click  to activate the Done confirmation screen, and then click to activate the following confirmation dialog box:
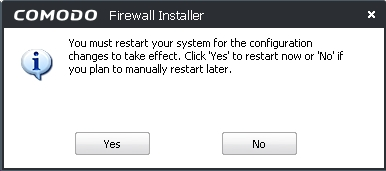
Figure 6: The Firewall Installer confirmation dialog box
Step 9. Click  to restart your computer, and complete the COMODO Firewall installation procedure.
After your computer restarts itself, the The New Private Network Detected! screen appears as follows:
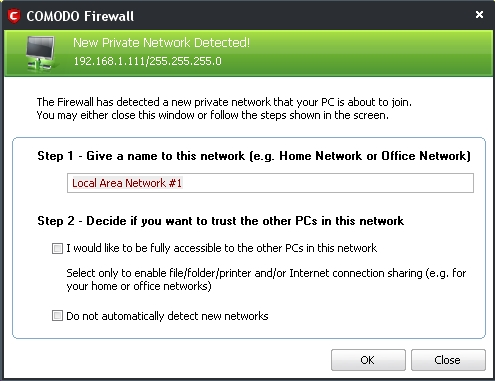
Figure 7: The COMODO Firewall New Private Network Detected! screen
Tip: If you are working in a LAN environment, simply check the I would like to be fully accessible to other PCs in this network option to enable file/folder/printer and/or Internet connection sharing.
Step 10. Either type in a name in the Give a name to this network for your network text field or simply accept the default name offered as shown in Figure 7 above. Leave the options listed under Step 2 – Decide if you want to trust the other PCs in this network unchecked, and then click to complete the installation.
The COMODO Firewall desktop icon and the COMODO Firewall connectivity icon simultaneously appear with figure 7. Before you connect to the Internet, the connectivity icon appears in the System Tray as follows:

Figure 8: The COMODO Firewall connectivity icon outlined in black in the System Tray
Going online or launching on-line related programs (for instance, web browsers) will trigger a series of light orange downwards-pointing arrowheads and/or light green upwards-pointing arrowheads, indicating incoming and outgoing Internet connection requests, and are depicted as follows:

Figure 9: The COMODO Firewall connectivity icon in action
After COMODO Firewall has been running for a few moments, the COMODO Message Center pop-up message appears as follows:
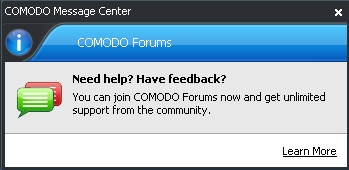
Figure 10: The COMODO Message Center pop-up screen
Note: Click the Learn more hyperlink to be directed to the COMODO forums community-based help.
Tip: Right-click the COMODO Firewall connectivity icon in the System Tray (as displayed in figure 10) to activate the following pop-up menu, and its associated sub-menus as follows:
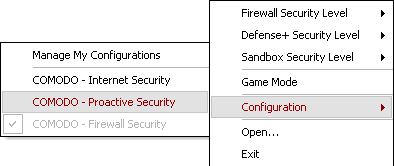
Figure 11: The connectivity icon Configuration menu and sub-menu
The connectivity icon menu lets you change the COMODO Firewall products you are using. Selecting the Configuration item activates the Manage My Configurations sub-menu where you can select either COMODO – Proactive Security or COMODO – Internet Security to enable the sandboxing feature.
In addition, each product may have its security level adjusted from within the connectivity icon pop-up menu as follows; these security levels are discussed in greater detail in sections 4.1 The Firewall Behavior Settings window and 4.2 The Defense+ Settings window
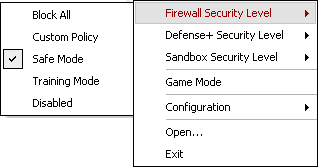
Figure 12: The connectivity icon Firewall Security Level sub-menu
3.0 How to Allow and Block Access Using COMODO Firewall
A firewall is a program designed to protect your computer from malicious hackers and malware. Both of these may attempt to directly access your computer, or send information from your computer to a third party. Comodo Firewall must be configured to ‘learn’ or record which applications are ‘safe’ and permit access to them, while blocking requests from unsafe software and rogue processes to your system. It may take a little experience over time to determine which requests are legitimate, and which are threats.
Every time Comodo Firewall receives a connection request, it activates a pop-up Firewall Alert prompting you to either Allow or Block access to your system to and from the Internet. The exercise that follows involving a safe program like Firefox will help you to become more familiar with firewall alerts and how to use them. Although exceptions are made sometimes for requests from universally accepted browsers and email programs, each time a connection request is made a Firewall Alert resembling the following appears:
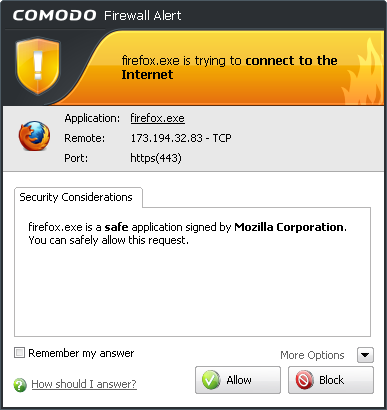
Figure 1: An example of a COMODO Firewall Alert
A firewall is simply a set of rules for monitoring inbound and outbound traffic. Every time you click Allow or Block COMODO Firewall generates a rule for that process or program network connection request. COMODO Firewall does this for both new or unrecognised processes and programs, as well as those listed in the Trusted Software Vendors list, in the Defense+ – Tasks > Computer Security Policy window.
Remember my answer: This option is used to record whether you allowed or blocked a certain program from accessing COMODO Firewall. It will automatically allow or block connection requests from this program the next time it attempts to connect to your computer, based on whatever choice you have specified here.
Important: We strongly recommend disabling the Remember my answer option when you first start using COMODO Firewall. Decide whether to allow or block different connection requests, and then observe how or if your decision affects your system operation. Enable the Remember my answer option if and only if you are completely sure of your decision.
Tip: Being strict about limiting access to you system is the best approach to computer security. Do not hesitate to block any suspicious or unidentifiable requests. If this causes a normal program to stop functioning correctly, you can allow the process to run next time you receive a firewall alert.
Step 1. Click  to activate the Properties window to learn more about the process or program requesting access, in this case, Firefox:
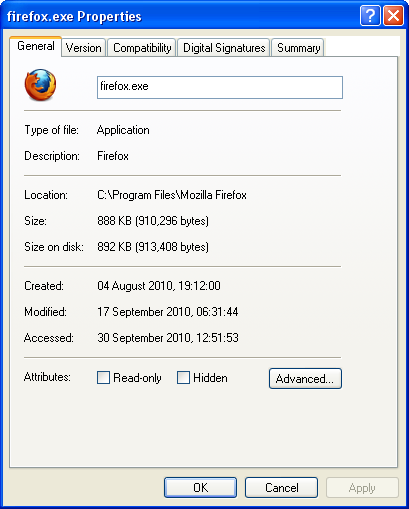
Figure 2: The firefox.exe Properties screen
Step 2: Click to close the program Properties screen.
Step 3: If you have either determined a request is unsafe, or are simply uncertain about it, based on the information displayed in the program Properties screen, click  to direct COMODO Firewall to deny access to your system. OR: If you have determined that a legitimate program is making a non-malicious request, based on the information displayed in the program Properties screen, then click
  to allow it access to your system.
Step 4. Click to allow Firefox to access your system through COMODO Firewall.
Step 5. Given that Firefox is a safe program, check the  option so that COMODO Firewall will allow Firefox to automatically access your system the next time.
Note: The Allow button lets you manually grant access to a process or program on a case-by-case basis.
Tip: Click  to access the extensive COMODO Firewall help files online.
Your ability to make the correct allow or block decisions will improve as you become more confident and experienced in using COMODO Firewall.
3.1 How to Open the COMODO Firewall Main User Interface
COMODO Firewall will automatically start working after you have installed and restarted your system. It features an extensive control panel with numerous customisable features and options. Beginner level users will quickly learn how to deal with COMODO Firewall security alerts, while Experienced and Advanced users will learn about more complex firewall configuration and management.
Note: All the examples shown here are based on COMODO Firewall in Optimum Defense mode. This means that the Defense+ host intrusion prevention system is automatically enabled. If you have installed COMODO Firewall using the Firewall only option, Defense+ will not be enabled.
To open the COMODO Firewall main user interface, perform this step:
Step 1. Select Start > Programs > Comodo > Firewall > Comodo Firewall.
Note: Alternatively, you can either double-click the desktop icon, or double click the COMODO Firewall icon in the System Tray to open the main user interface. In addition, you may right-click the COMODO Firewall icon to activate its pop-up menu, and then select Open as follows:
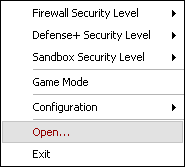
Figure 3: The COMODO Firewall connectivity icon pop-up menu
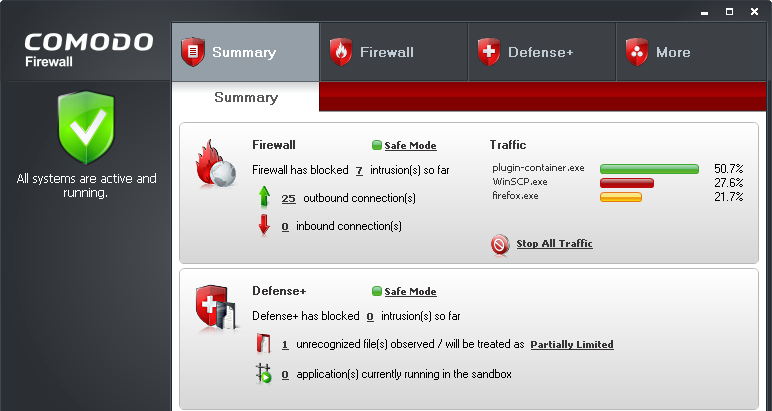
Figure 4: The Comodo Firewall user interface in the default Summary mode
3.2 An Overview of the COMODO Firewall Main User Interface
The Firewall pane displays a clear and concise summary of inbound and outbound requests from processes and programs attempting to get through the COMODO Firewall. Quite typically, there are more outbound requests than inbound. The default operating mode is Safe Mode, and different operating modes will be outlined later in this section. Traffic displays the different processes and programs in operation, and the number of requests being made in terms of percentages.
Click to activate the corresponding detailed summary of the outbound requests at a given moment as follows:
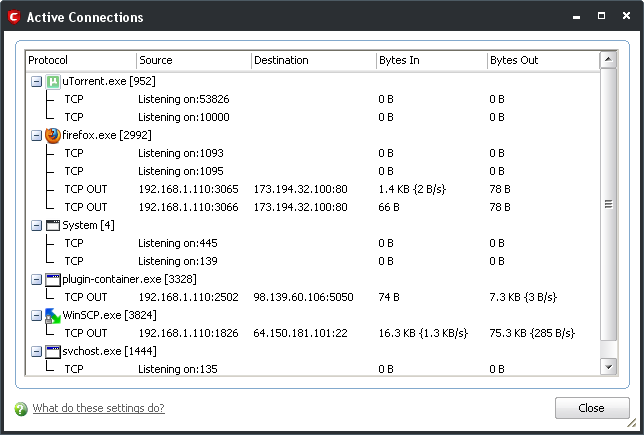
Figure 5: An example of the Active Connections window displaying Internet traffic details
Click  to activate a similar Active Connections window for the inbound requests at a given moment.
Tip: Click  to stop all inbound and outbound requests, if your Internet service suddenly slows down or stalls, and you have reason to suspect a malicious process or program is either downloading itself or in operation. Doing so immediately sets the Firewall operational mode to
  . Review the detailed summary in the Active Connections window to identify the possible source of the problem.
After you are certain you have resolved the issue successfully, click  to begin processing inbound and outbound requests to COMODO Firewall and return to
  as usual.
3.2.1 The COMODO Firewall Status icons
Both COMODO Firewall and Defense+ work together; if both programs are running, the indicator at the left of the main user interface appears as follows:
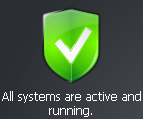
Figure 6: The green COMODO Firewall status icon
If either program is disabled, the status icon will indicate whether the firewall or proactive protection component is disabled as follows:
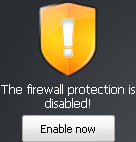
Figure 7: The yellow COMODO Firewall disabled status icon
However if both programs have been disabled, the status icon will appear as follows:
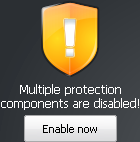
Figure 8: The yellow COMODO Firewall multiple protections disabled status icon
In either case, click  to enable the corresponding protection.
4.0 How to Access the Firewall Behavior and Defense+ Settings windows
The COMODO Firewall main user interface is divided into two panes, the Firewall pane and the Defense+ pane.
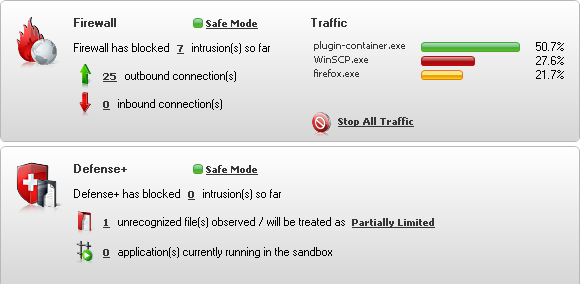
Figure 1: The COMODO Firewall main user interface displaying both the Firewall and Defense+ panes
The Firewall Behavior Settings and the Defense+ Settings windows can be accessed by clicking in either pane to activate their associated windows and their tabs.
Alternatively, you may access either of them by performing the following steps:
Step 1. Open the COMODO Firewall main user interface.
Step 2. Click either
 OR
OR 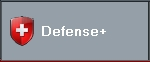
to activate the Firewall Tasks or Defense+ Tasks panes respectively.
Step 3. Click either
 OR
OR 
to activate the Firewall Behavior Settings tab or Defense+ Settings tab respectively.
Tip: The Firewall Security Level, Defense+ Security Level and Sandbox Security Level which are described in the following sections can be easily and effectively set using the COMODO Firewall connectivity icon located in the System Tray. Right click the connectivity icon to activate the pop-up menu and sub-menu as follows:
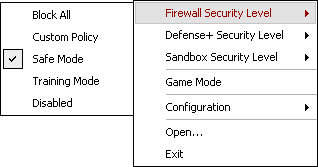
Figure 2: The connectivity icon pop-up menu and the Firewall Security Level sub-menu
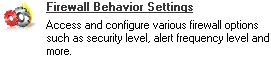
4.1 The Firewall Behavior Settings window
The Firewall Behavior Settings window lets you customize firewall security by using a variety of features and options, including the firewall security level, the number and type of security alerts received and packet analysis and monitoring.
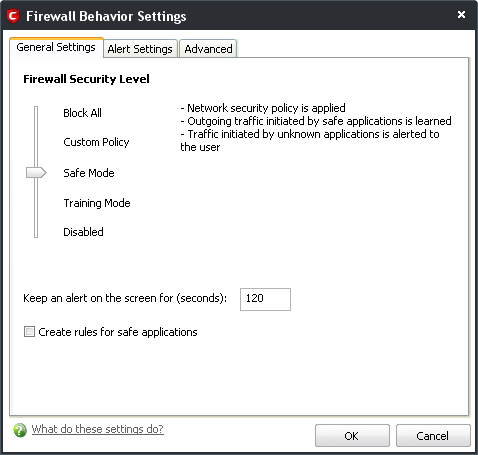
Figure 3: The Firewall Behavior Settings window – General Settings tab
The General Settings tab lets you specify the level of security you think appropriate for COMODO Firewall. The slider lets you adjust the level of security among the following options.
Block All: This mode stops all Internet-related traffic and overrides any firewall configurations and rules you have specified. It will neither generate traffic rules for applications, nor record or ‘learn’ their behaviours.
Custom Policy: This mode applies only the user-defined COMODO Firewall security policies and network traffic policies that you have previously defined in the Firewall Tasks > Network Security Policy and the Defense+ Tasks > Computer Security Policy windows.
Safe Mode: This mode is the default setting for the COMODO Firewall, including the Optimum Proactive Defense and Maximum Proactive Defense installations.
Tip: COMODO Firewall maintains an internal list of commonly used applications and files verified as safe, and does not issue pop-up alerts for them.
Warning: Both the Training Mode and Disabled Mode are not recommended as they may compromise the effectiveness of COMODO Firewall and expose your system to the risk of infection.
4.2 The Defense+ Settings window
Note: The features and options described in this section require a profound understanding of firewalls and related security issues, and is designed largely with the Advanced user in mind.
Important: If you checked either the Firewall with Optimum Proactive Defense or the Firewall with Maximum Proactive Defense options during the COMODO Firewall installation process, the Defense+ host intrusion prevention system was automatically enabled. However, if you checked the Firewall Only option, the Defense+ system can still be manually enabled. The Defense+ option must be enabled in order for many of the features documented here to work.
The COMODO Firewall Defense+ is a host intrusion prevention system. Any computer connected to a network is technically speaking, a host computer. The Defense+ system constantly monitors the activities of all executable files currently residing on your computer. An executable file is simply an application or program, or a part if it, and typically but not exclusively, is identified by the following file extensions: .bat, .exe, .dll, .sys, and others.
Defense+ issues pop-up warnings every time an unknown executable file attempts to run, and prompts you to either allow or block its functioning. It may prove important in situations where any type of maleware will attempt to install applications or programs to damage or steal your personal information, reformat your hard disk or hijack your computer, and use it to propagate malware or spam – without your consent or knowledge.
4.2.1 The Defense+ Settings – General Settings tab
To manually enable the Defense+ system and activate the Defense+ Settings window, perform the following steps:
Step 1. Click the Defense+ tab in the COMODO Firewall main user interface and then click  to activate the following screen:
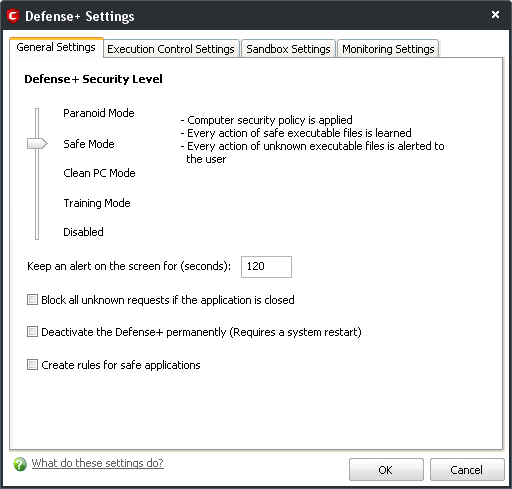
Figure 6: The Defense+ window displaying the default General Settings tab
Step 2. Move the slider up the scale to Safe Mode and then click to enable the Defense+ system as shown above in Figure 6.
The Defense+ Security Level resembles the Firewall Behavior Security Level which offers similar options, and lets you use a slider to choose the optimal level of host intrusion protection for your system.
Paranoid Mode: This mode is the highest available level of security, and monitors all and any executable files apart from those you have specified as safe, including those on the Trusted Software Vendor list. It generates the greatest number of security alerts, and system activity is filtered through your configuration settings.
Safe Mode: This mode will automatically ‘learn’ the behaviours of different application executables, while monitoring critical system activity. Every uncertified application will generate a Security Alert whenever it runs. This mode is the most widely recommended for the majority of users.
- The Block all unknown requests if the application is closed option automatically blocks all requests from unknown applications and programs, and those you did not specify in your Computer Security Policy).
- The Deactivate the Defense+ permanently (Requires a system restart) option lets you manually disable the Defense+ host intrusion prevention system. This option is generally not recommended.
4.2.2 The Defense+ Settings – Execution Control Settings tab
The Execution Control Settings tab limits the extent to which a suspicious or unknown file can access your system resources and execute itself, and submits them for analysis.
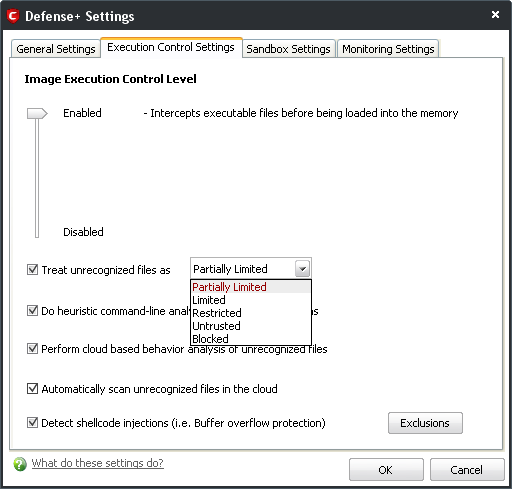
Figure 7: The Defense+ Execution Control Settings tab
Tip: Advanced users may create exclusions to the aforementioned tasks by clicking  to activate the Exclusions pane, and browsing for or selecting different processes or programs for exclusion.
Note: Experienced and Advanced users are strongly encouraged to click  to access the extensive COMODO online help concerning the Execution Control Settings, Sandbox Settings and Monitoring Settings tabs. Alternatively, you can refer to http://help.comodo.com/topic-72-1-155-1074-Introduction-to-Comodo-Internet-Security.html to choose from a list of online help topics.
Need Repairs Or Advice? Click Below:


- 2732
- 3

- 768
- 1